 |
 |
 |
 |
 |
 |
 |
 |
 |
![]()
|
|
|
|
|
|
|
|
|
![]()
 |
||
INSTALLING TABMEISTERTo install TabMeister simply copy it into the Applications folder on your hard drive, or anywhere else that you want to make its home. The first time you launch the TabMeister Application you will see the Preferences dialog, and there you will see an option: "Launch Automatically at Startup". As long as that checkbox is checked, TabMeister will automatically startup any time that you reboot or log back into your computer, so you don't ever have to think about it again.
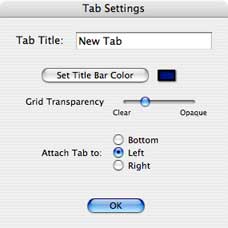
CREATING TABSTo create a new Tab, go to TabMeister's Tab menu and select "Create New Tab...". That will bring up the Tab Settings dialog where you can set some parameters of the new tab:
Here you can name the Tab, set the titlebar's color, set the transparency of the tab window, and set the screen edge that you want the Tab attached to. It should be noted that you never need to Save anything in TabMeister. Every time you edit a Tab the application saves the settings automatically for you. NOTE: Clicking on a tab does not bring the TabMeister application to the front. Whatever application you are using will remain active, but if you need to bring TabMeister to the front in order to access its menus, then click on the TabMeister icon in the Dock.
ADDING ITEMS TO TABSTo add an application, file, or folder to a tab simply locate the file in the Finder and drag it over to the Tab. When you drag it over, the Tab will automatically pop open and you can drag and drop the file into any grid slot that you like. Once there, you can drag items around the grid to reorganize them:
NOTE: Adding an item to a Tab does not physically move or copy the file in any way. The file that you add to the Tab remains where it was, and the icon in the Tab is simply a graphical link to the original file.
|
||
©2012 Pangea Software, Inc.
All product names are trademarks of Pangea Software, Inc. unless otherwise noted