 |
 |
 |
 |
 |
 |
 |
 |
 |
|
|
|
|
|
|
|
|
|
 |
|||
 |
|||
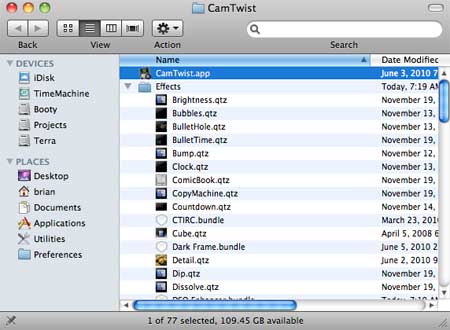
Using the Astro Filters with CamTwistTo use our Astro Filter Pack you need CamTwist - a program developed by Steve Green for video podcasting. CamTwist is a very powerful program because it allows you to choose a video source, apply effects (filters) to it, and then send the modified video stream to other video applications. CamTwist is the foundation that the Astro Filter Pack is built upon, and luckily, both are free! To install the Astro Filters in CamTwist, simply drop them into the Effects folder in the CamTwist folder:
Proper Configuration is Critical!In order for the Astro Filter Pack to work properly, you must order the filters correctly in CamTwist. Below is the proper ordering (See the 'Effects in use' pane): |
|||||||
 |
|||||||
1. Stack2. Dark Frame (optional)*3. Amp Glow4. DSO Enhancer5. Noise Mask |
|||||||
| * We recommend you only use the Dark Frame filter when absolutely necessary. The other filters will generally get you the results you need without the hassle of using a Dark Frame. | |||||||
Combine the Stack, Amp Glow, DSO Enhancer, and Noise Mask for Best ResultsTo get the best quality images from the Astro Filter Pack you need to have the filters in the above order, and in most cases you should be using these 4 filters together: Stack, Amp Glow, DSO Enhancer, and Noise Mask. So, when starting to view a new celestial object follow this procedure: |
|||||||
|
|||||||
The Filters |
|||||||
|
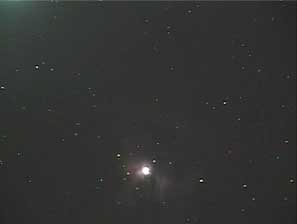
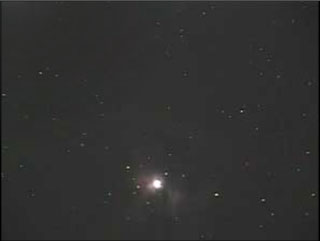
IMPORTANT TIP: You want the video coming from your camera to be as noise-free as possible. You will get dramatically better images from these filters with a clean video feed. So, you should set the gain (AGC) on your camera to the lowest setting possible for each object you are viewing. On a Mallincam, start with the AGC set to the 3rd or 4th tick mark. If there is grain in the image then lower it, if it looks clean after filtering then you may be able to bump it up a little more. Just remember: lower is better! A dark & clean video signal is better than a bright but noisy one. Let the Stack filter fix a dark image (see the samples if you don't believe me). |
|||||||
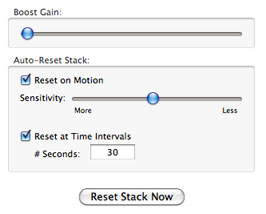
StackThis is a frame stacking filter that accumulates video frames over time. It is used to eliminate signal noise and to boost the image without the typical pixel grain that other boosting methods (such as brightness and gamma) cause. The Boost Gain slider brings out details in underexposed & dark images. This can work miracles on dark video signals! The Auto-Reset on Motion option will automatically reset the stack if it detects a significant change in the image. You should almost always leave this on and have the sensitivity set pretty high if not all the way to the maximum (to the left). The Time Intervals option lets you tell the stack to auto-reset at fixed time intervals (useful for fork-mounted telescopes which will have field rotation over time, or when you know your scope has difficulty tracking). |
|||||||
 |
|||||||
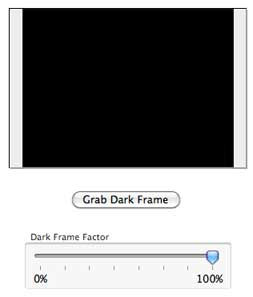
Dark FrameThis lets you take a dark frame and subtract it from the incoming video stream. It will eliminate hot pixels and other artifacts that are inherent to the video system. (Personally, I never use this filter since the Amp Glow filter is an easier and more effective solution.) To use, put the lens cap on your telescope to make everything dark. Wait for your camera to complete an exposure and then press the Grab Dark Frame button. It will capture that frame and any non-black pixels will be subtracted from the video source as long as the filter is enabled. The Dark Frame Factor slider will allow you to adjust the effectiveness of the dark frame. 100% means that the dark frame is entirely subtracted from the source video. 50% would mean that it only subtracts half of the dark frame's value. |
||||
 |
||||
 |
||||
Amp GlowAmp Glow is the annoying green glow that eminates from the upper-left corner of a Mallincam. Nothing ruins your shot more than amp glow, but luckily this filter does an outstanding job at removing it. • X Shift: This sets the horizontal location of the amp glow. The amp glow doesn't actually come from the exact corner of the frame, but rather slightly to the right, so this slider lets to tweak that location. • Radius: This sets the radius of the amp glow. You generally don't want to overdo this. Just set the radius large enough to remove the amp glow, but no larger. • Glow Color: This lets you tweak the color of the amp glow that you are removing. You need to match the color to get the best results. Just play around with it to get the results you like. • Power: This sets the amount of amp glow reduction. Normally it should be set to 0. • Grey Fill: This is a very important part of this filter! If your shot has a grey cast for space (instead of black) then the Amp Glow filter may cause a dark zone to appear where the amp glow had been. This Grey Fill slider lets you adjust that zone to match the rest of the image. With this you can make the amp-glow-reduced areas blend perfectly. |
||||
 |
||||
 |
||||
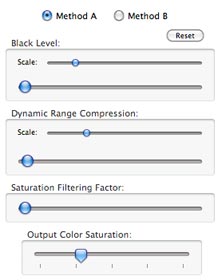
DSO EnhancerThis is the filter that does the serious work. It darkens the sky so space is black while enhancing the celestial objects. In the settings you'll see Method A and Method B. Method A is the best choice 80% of the time, but fiddle with each method on different objects and see what works best for you. The Black Level darkens space, and the Dynamic Range Compression slider brightens objects. The "Scale" setting above each gives you fine control over the sliders, but it does not affect the image. Changing the scale simply changes the range of the Black Level or Dynamic Range sliders. When using the DSO Enhancer, follow this basic procedure: |
|||||||||||
 |
|||||||||||
|
|||||||||||
|
The DSO Enhancing process tends to desaturate the colors, so you'll need to use the Color Saturation slider to restore the object's color. You should work in baby-steps when adjusting the sliders. Being too aggressive will only make the images grainy and contrasty. Make small adjustments one by one and you'll get a beautiful, clean image. |
|||||||||||
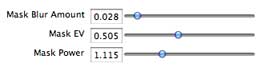
Noise MaskWhat this filter essentially does is create a mask from the video image and use that mask to reduce or eliminate many forms of grain and noise. At the same time it further darkens space to make it pure black in most cases. The Mask Blur Amount should usually be set pretty low as you see in the screenshot. The Mask EV value sets the contast value of the generated mask. |
|||||||||||
 |
|||||||||||
|
The Mask Power is the most important value here. This determines how much the mask affects the video frame. Too low and it has no effect, too high and it trims the edges of the object you're viewing. So, use this with care and you'll get outstanding images! |
|||||||||||
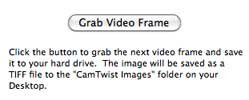
Frame GrabberThis lets you grab a frame of video and save it out as a TIFF file (how all of the screenshots here were made). The TIFF files get saved into a folder named "CamTwist Images" that will be created on your Desktop. You can put the Frame Grabber anywhere in CamTwist's effects stack so that it will save out the image at any point in the process. If you want to save out an unfiltered image then place it at the top of the stack, or if you want to save out the image after all of the filters have been applied then place it at the end. |
|||||||||||
 |
|||||||||||
SupportIf you need help or have suggestions, please contact: support@pangeasoft.net Please note this answer to the most common question: "Is there a Windows version?" The answer: NO. Sorry, but CamTwist is Mac-only, and our filters are also Mac-only. They are heavily based on Quartz and Core Image which are Mac OS X technologies that do not exist on Windows, so there will never be a PC version of the Astro Filter Pack. |
|

©2010 Pangea Software, Inc.
All product names are trademarks of Pangea Software, Inc. unless otherwise noted